Clipchamp Video Editing Tips and Tricks (YouTube link)
A couple of friends asked me what tool I used to do AI video editing and how. Here are the details of using Microsoft Clipchamp for my new videos.
Clipchamp is free with some goodies
At beginning, I used to be in the camp of using "Photos Legacy". But, after I've discovered the new tool named Clipchamp, I've moved on with no regret mainly because the new "Create a video with AI" feature. With the new AI feature, we are empowered with:
Using AI-powered features to enhance my video editing in Clipchamp's easy online video editor
Condensing and abstracting a collection of video clips into a nice short video for YouTube uploading
Learning Clipchamp features from the AI-generated video example
Note that you can choose to finalize your newly AI-generated new video as is or you can edit it further manually. And, I like to modify AI-generated video further by adding my own ideas (e.g., adding new title pages, etc.).
Other capabilities include:
Text to speech
Auto-captions
etc.
Two Versions of Clipchamp
You can download Clipchamp app to your laptop or you can use web-based version (link) with Chrome browser (note that Firefox is not supported). Both versions share the same user account.
Once I've run into "Buffering" issue on my Clipchamp app and was advised by a Microsoft Clipchamp support person (or bot?) by switching to web-based version to resolve the issue with the following support document:
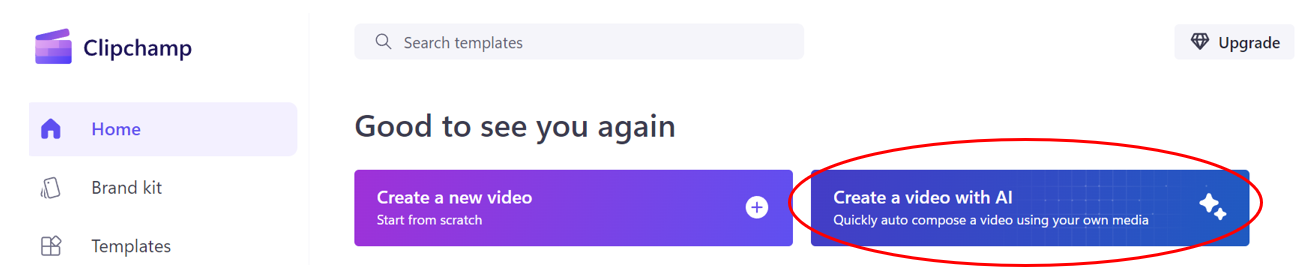
Once you have signed into Clipchamp, click on the "Create a video with AI" button.
Add your media after you specify the project type and vide type...
Drag & drop your clips. But, you may want to sort the clips by some order first (e.g., name or datetime).
After clicking on "Get Started", it moves to select which video style you would like to have (you can explore and select a style you want or just let AI choose.
Next you select which aspect ratio suits your video and how long should your video be...
Next you can either finalize your AI-generated video or edit it further
Edit in Timeline
As shown below, I've edited my video further by:
Adding two photos (as highlighted) to be used at the beginning and ending portions of the video
Adding Text to the title page as highlighted
Adjusting overlay and audio timelines based on the new durations
A Quiet Day in a Berlin Park, 1933 In the early 1930s, Takehisa Yumeji's studio became a hub for artists, inspiring ventures like the Mt. Haruna Art Research Institute. In 1931, Yumeji began a journey to the United States and Europe, supported by exhibitions of his work. While in the U.S. for 16 months, he continued to paint, creating pieces like Nude on the West Coast. Afterward, Yumeji taught in Berlin until the school was closed by the Nazis. He returned to Japan in 1933, his overseas experiences shaping his final works. His last exhibition was held in Taipei that year. Yumeji passed away from tuberculosis in 1934, leaving behind a legacy of beauty and cultural exchange. Read more: Prints in Collection—Takehisa Yumeji (1884-1934) Kuronosuke 黒の助: a Legacy Little Black Cat (YouTube link ) Photo Gallery The Yumeji Art Museum in Okayama exhibits many black cat paintings because the artist, Yumeji Takehisa , frequently featured them in his work, particularly in his bij...
Hagi City , Yamaguchi Prefecture, Japan, is a UNESCO World Heritage Site renowned for its maritime and historical significance, particularly from the Edo period and Meiji Restoration . This coastal town captivates with its well-preserved samurai districts, pine-lined roads, clear waterways, and serene ambiance, evoking a nostalgic journey back in time. Historical figures like Yoshida Shoin and Shinsaku Takasugi shaped its legacy. Cycling, boat trips, temple visits, and local specialties like summer tangerines and Hagi ware highlight Hagi’s charm. Hidden gems like Tokoji Temple make it a must-visit for an authentic, enriching experience. Japan’s Timeless Beauty – 2 Days in Hagi, a World Heritage Town (YouTube link ) Things to Do Boat Trip: A 40-minute sightseeing boat tour provides a unique perspective of Hagi, with reflections on the town’s historical significance during the ride. Bicycle Rental: You can rent a bike at the station, which is a recommended way to explore Hagi. C...
Koyasan (高野山), a popular pilgrimage destination for centuries, has been connected to the outside world by a network of pilgrimage trails. While most visitors enter the mountain by cable car nowadays, many of the pilgrimage trails still remain in use. Koyasan Travel—Temple Lodging (Shukubo; YouTube link ) Part of the pilgrimage trails, the Fudozaka Trail (不動坂; click the map to enlarge), leads to Koyasan from Gokurakubashi Station, the lower station of the Koyasan Cablecar. The steep, paved trail is 2.5 kilometers long and takes about an hour to ascend and less time to descend. The trail ends at the Nyonindo temple (女人堂). [1] On 11/27/2016, I have decided to descend from Fudozaka Trail instead of riding the cable car. I was the only person on the trail at beginning. However, in the middle of the trail, another young blonde girl passed me by swiftly with a big smile on her face. I was really surprised to see another soul on that rainy day. Althoug...